Vanessa's Recipes

Posts tagged ‘Cake’

Birthday Cake

100_0053

My son asked for a solar system cake this year and I realized I’d have to learn how to make a fondant if I was going to have a modicum of success at making planets.  He’d seen a picture online and had his heart set, and I was determined not to let him down.  Smile

It’s just a regular box cake, chocolate, per his request.  To make the background dark to represent space, I added some blue gel color to chocolate frosting. 

For the planets, I made fondant from a recipe I found online and that worked out really well.  Whew!  I used gel color for their coloring as well.  It really was fun to work with, if a bit on the messy side.  The gel color washed off very easily though, so that was good.

For stars, my son picked out some little pearl cake decorations. 

I think I was a little enthusiastic on making my planets!  LOL  They’re a little on the big side, too big to fit nicely across a 13×9 cake, so my scale is off.  But my son was happy, and I did manage to leave at least enough room to put his name and age, if not the whole Happy Birthday part.  Smile

Rolled Buttercream Fondant Recipe

This is where I got the recipe: Rolled Buttercream Fondant Recipe – Allrecipes.com

I have to say, it was MUCH easier to make fondant than I thought it would be.  I was pretty intimidated at first, but my son wanted a solar system cake so I had to figure out a way to make it.  Smile

Turns out, even without a stand mixer, mixing it was fairly easy.  It did require a bit of muscle, but honestly, not as much as making bread by hand.

It was a bit on the greasy side though, due to the shortening, so you’ll need lots of soap and water to wash your hands with afterward. 

I did find that the finished product was a bit on the soft side.  I used it for making planets, not for actually frosting the cake, but it would work well in that application.  It would also work well for cut out flat shapes, but it would probably be a bit too soft for more elaborate shapes that need to stand on their own.  But for the home baker, it’s an easy and fun way to decorate.  Smile

I’d also recommend reading through the the reviews of it on the website too – they had some great tips!

By the way, I didn’t have clear vanilla, I just used regular, and it still came out pretty white. It was basically eggshell white, if not a pure white, and I also used gel colors and they worked great.

 
Ingredients
  • 1 cup light corn syrup
  • 1 cup shortening
  • 1/2 teaspoon salt
  • 1 teaspoon clear vanilla extract
  • 2 pounds confectioners’ sugar


Directions
  1. In a large bowl, stir together the shortening and corn syrup. Mix in the salt and vanilla flavoring, then gradually mix in the confectioners’ sugar until it is a stiff dough. If you are using a stand mixer, use the dough hook attachment. Otherwise, knead by hand. If the dough is sticky, knead in more confectioners’ sugar until it is smooth. Store in an airtight container at room temperature or in the refrigerator.
  2. To use, roll out on a clean surface that has been dusted with confectioners’ sugar until it is 1/8 inch thick or thinner if you can. Drape over frosted and chilled cakes and smooth the sides down, or cut into strips to make bows and other decorations.

Taste the Rainbow Cake

For my daughter’s birthday, by special request, I made a rainbow cake.  It turned out really well.  I followed the directions I found over on this blog:

how to make a rainbow cake!


I didn’t use the diet recipe because my 6 year old isn’t on a diet but that recipe does look super simple.  Smile  I just followed the standard directions on the box mix I used. 
100_0008

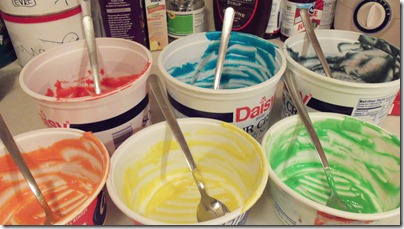
Mixing the colors was fun.  Finding enough bowls to mix them in was a pain!  LOL  I didn’t mix the basic cake mix much at all, just a rough mix, since I knew the batter was going to get a longer mixing once I added in the colors.  Then I divided into 6 roughly equal portions.  I ended up with about 1 and 1/3 c. of batter per color.  I used about 24 “dots” of gel for each color as well.  The orange and purple you have to design yourself but I found that about a 3-1 ratio of yellow to red made a good orange, and the same for blue to red made a decent purple.
100_0011

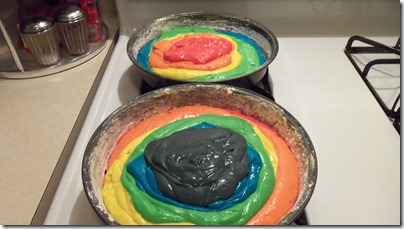
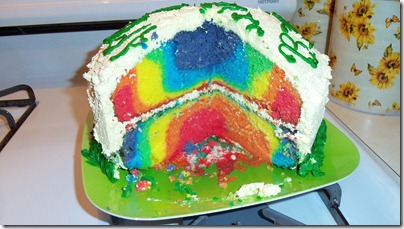
I followed the recipe creator’s instruction to use a greater amount of the bottom colors first, and also to reverse them in the pans.
100_0013

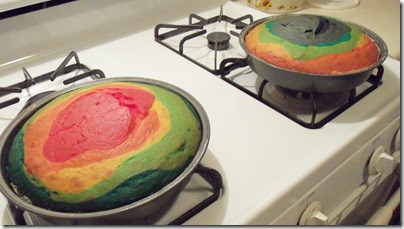
I needed to bake mine a little longer than the box called for (about 5-8 min), probably because I was using 2 boxes of cake mix, like the recipe called for.  My cakes seemed more brown than the creator’s did, but I also used the egg whites and oil in mine so that may account for some of that golden color too.
100_0025

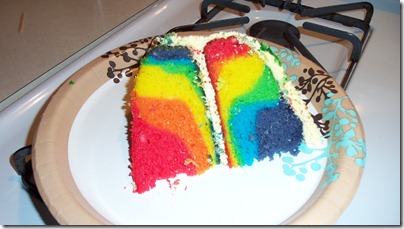
Once it was done though, and we cut into it, the vibrancy of the colors really came through! 
100_0026

The pudding/Cool Whip frosting mix tasted really good but it was just a tad sticky to work with.  I recommend pushing the frosting.  It’s a technique I was taught many years ago.  You put a big glob of frosting on the middle of your cake and then spread it by gently pushing small areas of the glob away from the center rather than adding small globs a little at a time and pulling them toward you.  Don’t try to “smear” the frosting or you’ll tear your cake.

Also, I opted to simply invert my bottom layer when I assembled it, rather than slicing some off to make it level. 

It was so much easier than I thought it would be, the hardest part really was just mixing the colors over and over because that got a little old and repetitious because I did it by hand but otherwise, it was lots of fun, and the “ooh!” factor from my kids was the best part.  Open-mouthed smile

Okay, I “oohed!” too.  Winking smile

Cross-posted at At Grandma’s Table

Cake-Pie with no name

Begin the day before as this needs to chill overnight and you’ll need time to cool the crust also.

You will need:

  • 13×9 glass pan

Layer 1:

  • 1 c. flour
    ½c margarine or butter
    1 c. chopped pecans – or any nuts but walnuts aren’t very good in this recipe, and neither are peanuts.  An almond/pecan mix is pretty good, and my husband thinks hazelnuts might be good too.  

Layer 2:

  • 1 c. sugar
    8 oz. cream cheese
    (half of) 1 lg container of Cool Whip (12 or 16 oz)

Layer 3:

  • 1 lg pkg Jell-o instant chocolate pudding
    1 lg pkg Jell-o instant vanilla pudding
    3 c. milk

Layer 4:

  • remaining half of Cool Whip
    Hershey chocolate bar, plain

To begin:

Layer 1

  • Preheat your over to 350° – this is the only baking you will do for this recipe.
  • If you have a food processor you can use that, or a hand mixer will work great too.  Mix the nuts, butter, and flour to a paste.  It will be lumpy because of the nuts, you’re not looking for nut dust or anything.  Press this mix into the cake pan and bake for 20 min.  Allow to cool completely before adding the other layers.

Layer 2

  • Cream together the cream cheese, sugar, and half of the Cool Whip.  Pour onto the cooled crust and spread evenly.

Layer 3

  • Don’t begin this step until you are ready.  If you make it too far in advance, the pudding will set and be very difficult to spread over the previous layer.
  • Combine the pudding mixes with the milk and mix.  Don’t follow the box directions, just pour the dry mixes into a lg bowl, add the milk and mix together.  Before it sets, pour it over the cream cheese layer, and smooth it out evenly.  Allow to set.  Since it’s instant pudding, this will only take a few minutes.  When it’s chilled, go on to the next step.

Layer 4

  • Spread the remaining half of the Cool Whip over the pudding layer.
  • Chill overnight in the fridge.  Just before serving, you can grate (part of) a plain Hershey bar over the top to make little chocolate curls for decoration, or you can add sprinkles of some type but keep in mind they will probably bleed into the topping after a while.  If that is important to you. 
  • Now, eat and gain weight.  🙂

If you can think of a name for this, let me know!  I was thinking Chocolate Snow Pie, but I’m no good with such things.  🙂

Tag Cloud